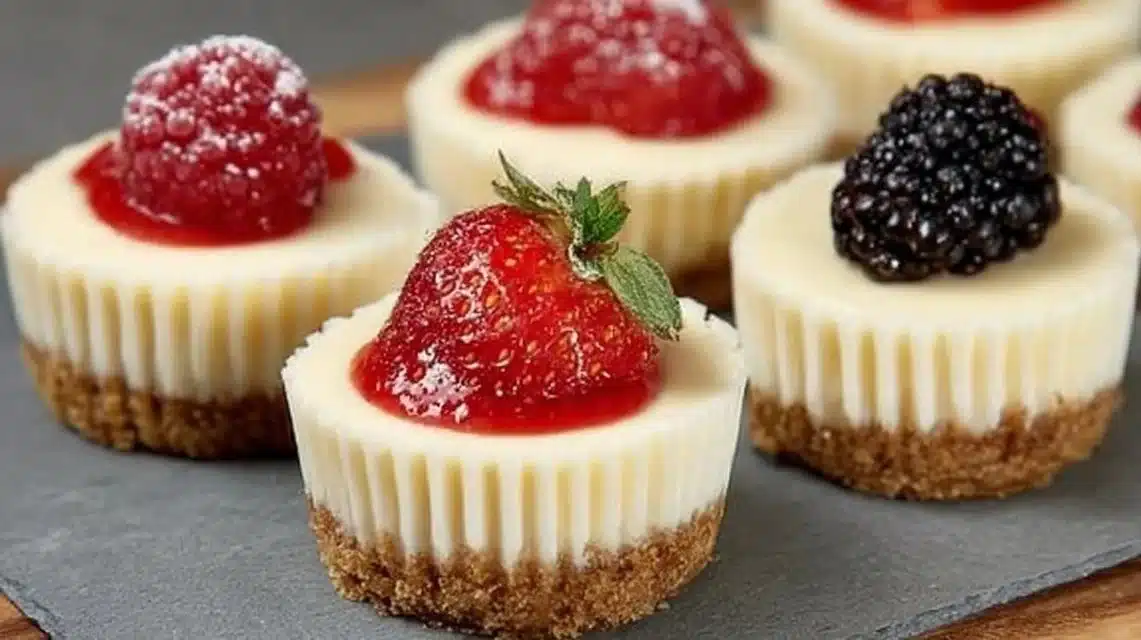
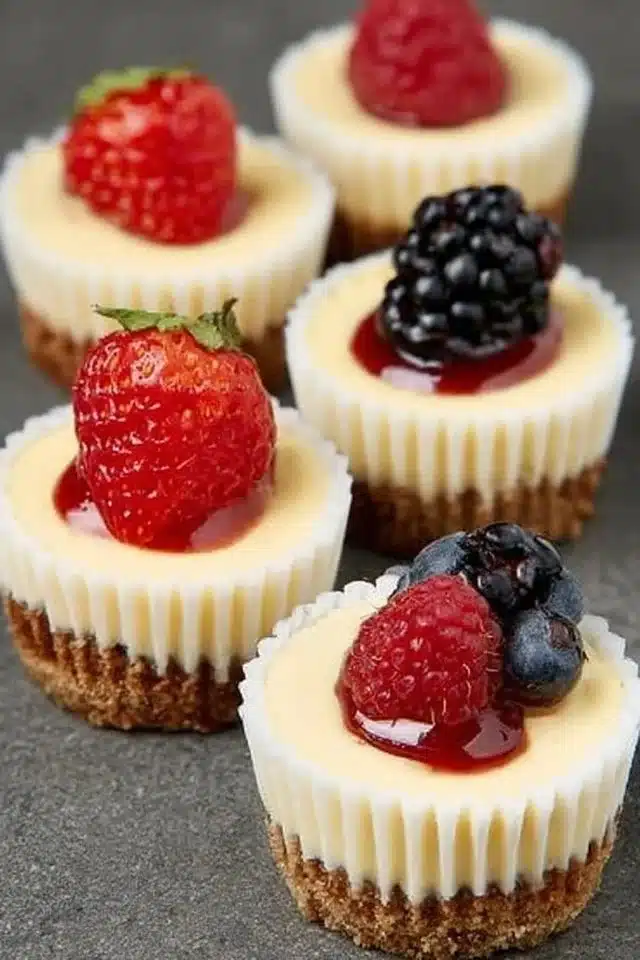
Mini cheesecakes are creamy, tangy, and perfectly portioned for any occasion. They have a crisp graham cracker base and a smooth cream cheese filling that’s rich but light in each small bite. These minis are easy to make with just a few pantry staples and a standard muffin tin, so you can whip them up for brunch, dessert, or a party. They chill quickly, travel well, and pair nicely with fresh berries or a spoonful of jam. For another small-batch baking idea that’s great for meal prep, try high-protein pancake sausage mini muffins for savory minis.
Why You’ll Love This Mini Cheesecakes
- Bite-size portions that are easy to serve and control calories.
- Silky cream cheese filling with a buttery, slightly crunchy graham crust.
- Quick prep—mix the crust, blend the filling, and bake in one pan.
- Uses everyday ingredients you likely already have.
- Chill time is hands-off, making it great for make-ahead parties.
- Flexible: top with fruit, chocolate, or keep them plain.
- Portable and neat to eat—no slicing or fancy plating needed.
- Kid-friendly and crowd-pleasing at gatherings.
What Is Mini Cheesecakes?
Mini cheesecakes are single-serving cheesecake portions baked inside a muffin tin. They keep the classic cheesecake flavor—tangy cream cheese, sweet vanilla, and a buttery graham base—concentrated into a small, easy-to-eat cake. The texture is smooth and creamy in the center with a firmer, slightly jiggly finish right out of the oven. This recipe uses a straightforward baking method (no water bath required) and a low oven temperature to gently set the filling. The overall vibe is comfort food that’s also elegant enough for a brunch or casual party.
Ingredients for Mini Cheesecakes
For the Base
- 1 1/2 cups graham cracker crumbs
- 1/3 cup sugar
- 1/2 cup butter, melted
For the Filling
- 2 (8 ounce) packages cream cheese, softened
- 1 cup sugar
- 1 teaspoon vanilla extract
- 2 large eggs
To Serve (optional)
- Fresh berries, fruit compote, chocolate sauce, or jam (not required)
Ingredient Notes (Substitutions, Healthy Swaps)
- Cream cheese: Full-fat gives the creamiest texture. For a lighter version, use reduced-fat cream cheese but expect a slightly softer texture and milder flavor.
- Graham cracker crumbs: Use digestive biscuit crumbs if graham crackers aren’t available. You can also pulse whole graham crackers in a food processor or place them in a bag and crush with a rolling pin.
- Sugar: You can reduce sugar by 1–2 tablespoons for a less-sweet cheesecake. For baking alternatives, use granulated sugar substitutes marked as 1:1 baking replacements.
- Butter: If you need dairy-free, substitute with a neutral-flavored vegan buttery spread that’s suitable for baking; crust texture may vary slightly.
- Eggs: For an egg-free diet, note that eggs help set the filling—omitting them will change texture. Use a tested egg substitute only if you have experience with cheesecake-style bakes.
Step-by-Step Instructions
Step 1 – Prep the pan and oven
- Preheat the oven to 325°F (160°C).
- Line a standard 12-cup muffin tin with cupcake liners or lightly grease the cups.
Visual cue: Liners help with easy removal and neat presentation.
Step 2 – Make the crust
- In a bowl, combine 1 1/2 cups graham cracker crumbs, 1/3 cup sugar, and 1/2 cup melted butter.
- Press the mixture firmly into the bottom of each cupcake liner to form the base.
Visual cue: The crust should hold together when pressed—use the flat bottom of a glass for compact, even bases.
Step 3 – Mix the cream cheese
- Beat the 2 (8 ounce) packages cream cheese until smooth and free of lumps.
- Mix in 1 cup sugar and 1 teaspoon vanilla extract until combined.
Step 4 – Add eggs
- Add 2 large eggs one at a time, mixing well after each addition until the batter is smooth.
Pro cue: Scrape the bowl so no pockets of cream cheese remain—this keeps the filling silky.
Step 5 – Fill the cups
- Pour or spoon the cream cheese mixture over the crusts in the muffin tin, filling each about three-quarters full.
Step 6 – Bake
- Bake at 325°F (160°C) for 20–25 minutes, until the centers are set and slightly jiggly.
Pro cue: Centers will still wobble a bit but should not be liquid. Overbaking makes them dry.
Step 7 – Cool and chill
- Let the mini cheesecakes cool to room temperature, then refrigerate for at least 2 hours before serving.
Visual cue: Refrigerated cheesecakes will firm up and slice or pop out of liners cleanly.
Pro Tips for Success
- Use room-temperature cream cheese and eggs to avoid lumps in the batter.
- Don’t overmix once the eggs are added—beat just until combined to keep the filling smooth.
- Press the crust firmly and evenly so it holds together when serving.
- Bake in the center of the oven for even heat and consistent doneness across all cups.
- Let them cool fully before refrigerating—rapid cooling can cause cracks.
- Test doneness by gently jiggling the pan; the center should wobble slightly but not be runny.
- Chill for at least 2 hours; longer chilling (4+ hours) improves texture and flavor.
- Use liners for easier serving; if you skip liners, grease the cups well.
Flavor Variations
- Optional: Fresh Berry Topping — Spoon a mix of fresh strawberries, blueberries, or raspberries on each mini after chilling.
- Optional: Lemon Cheesecake — Add 1–2 teaspoons fresh lemon zest to the filling for a bright citrus note.
- Optional: Chocolate Swirl — Melt 1/4 cup chocolate, swirl a little into each cup before baking for a marbled effect.
- Optional: Caramel Drizzle — Top cooled minis with a small spoon of caramel sauce just before serving.
- Optional: Espresso Kick — Mix 1/2 teaspoon instant espresso powder into the filling for a subtle coffee flavor.
- Optional: Nut Crunch — Sprinkle chopped toasted nuts over the crust before adding the filling for extra texture.
Serving Suggestions
- Serve chilled with a spoonful of fruit compote or fresh berries on top.
- Place on small dessert plates with a mint leaf for a pretty presentation.
- Offer a trio of toppings (chocolate sauce, caramel, berry jam) and let guests choose.
- Pack leftovers in a single layer in an airtight container for easy grab-and-go desserts.
- Pair with coffee or tea for a mid-afternoon treat.
- Serve at brunch next to fresh fruit and light pastries for balance.
- Use as party finger food arranged on a platter for easy passing.
Make-Ahead, Storage & Reheating
- Make-ahead: You can prepare the minis up to the end of Step 6, cool them, and refrigerate for up to 24 hours before serving. Chilling longer (2–24 hours) deepens flavor.
- Storage: Store in an airtight container in the refrigerator for up to 4–5 days.
- Reheating: These are best served cold. If you prefer slightly warmer, let them sit at room temperature for 15–20 minutes before serving.
- Texture changes: Refrigeration firms the filling and enhances creaminess. If left out too long, the filling will soften.
Storage and Freezing Instructions
- Fridge: Place cooled cheesecakes in a single layer in an airtight container. They keep well for 4–5 days.
- Freezing: You can freeze mini cheesecakes for up to 1 month. Wrap each cooled mini tightly in plastic wrap and place in a freezer-safe container. Thaw in the refrigerator overnight before serving.
- Tip: Add toppings like fruit or sauces after thawing rather than before freezing to keep textures fresh.
- If you prefer not to freeze: store in the fridge and eat within 4–5 days for best texture and taste.
Nutrition Facts (Per Serving)
Calories | Protein | Carbs | Fat | Fiber | Sodium
— | —: | —: | —: | —: | —:
350 kcal | 4 g | 33 g | 23 g | 0.5 g | 170 mg
Estimates vary by brands and portions.
FAQ About Mini Cheesecakes
Q: Why did my filling crack?
A: Cracks usually come from overbaking or rapid cooling. Bake until just set and let them cool gradually at room temperature before chilling.
Q: Why are my minis watery or runny in the center?
A: They need more bake time. Return to the oven for a few more minutes until centers are set and only slightly jiggly.
Q: Can I make these without eggs?
A: Eggs help set the filling. You can try a tested egg substitute, but texture and firmness will change.
Q: Can I use low-fat cream cheese?
A: Yes, but expect a slightly softer and less rich texture compared to full-fat cream cheese.
Q: How do I remove liners without tearing the crust?
A: Run a thin knife around the edge if needed, or gently peel the liner off once chilled. Using good-quality liners helps.
Q: Can I double the recipe?
A: Yes. Bake in batches or use multiple muffin tins. Keep baking time similar but watch the centers for doneness.
TastyInspo Notes
- Chill the tray on a flat surface so each mini cools evenly and stays level.
- For uniform crusts, press crumbs with the bottom of a small glass for a neat finish.
- Keep a small offset spatula on hand to smooth any edges before chilling.
- Label containers with date if you make ahead to track freshness.
- Small paper flags or labels on toothpicks add a simple decorative touch for parties.
- If serving a crowd, place minis on a tiered stand to save space and add height.
Troubleshooting
- Bland flavor: Add 1/4 to 1/2 teaspoon extra vanilla or a touch of lemon zest to brighten the filling.
- Overcooked or dry: Reduce bake time by a few minutes next time; remove when centers are just slightly jiggly.
- Soggy crust: Press the crust firmly and bake briefly for a few minutes before adding filling if your crust seems loose.
- Lumpy filling: Beat cream cheese thoroughly at room temperature before adding sugar and eggs.
- Sticking to liners: Use good-quality liners or lightly grease cups if you want cleaner removal.
- Uneven baking: Rotate the pan halfway through baking if your oven has hot spots.
Conclusion
For a tested small-batch version and another helpful guide, see Mini Cheesecakes (in a Standard Muffin Pan) – Sally’s Baking for extra tips and photos to inspire your baking.
Final Thoughts
Mini cheesecakes are a simple, crowd-pleasing dessert that balance rich creaminess with a crisp crumb. They are quick to make, easy to customize, and great for make-ahead entertaining. With just a few steps and basic ingredients, you’ll have a delightful treat ready to chill and serve.
Mini Cheesecakes
Mini cheesecakes are creamy, tangy, and perfectly portioned bites with a graham cracker base and a smooth cream cheese filling, ideal for any occasion.
For the Base
- 1.5 cups 1 1/2 cups graham cracker crumbs (Use digestive biscuit crumbs if graham crackers aren’t available.)
- 1/3 cup 1/3 cup sugar (Can reduce by 1–2 tablespoons for a less-sweet cheesecake.)
- 0.5 cup 1/2 cup butter, melted (Dairy-free alternative: use a neutral-flavored vegan buttery spread.)
For the Filling
- 2 packages 2 (8 ounce) packages cream cheese, softened (Full-fat cream cheese gives the creamiest texture.)
- 1 cup 1 cup sugar (Reduce for less sweetness if desired.)
- 1 teaspoon 1 teaspoon vanilla extract (Add extra for enhanced flavor.)
- 2 large 2 large eggs (For egg-free, use a tested egg substitute.)
To Serve (optional)
- Fresh berries, fruit compote, chocolate sauce, or jam (Toppings are optional.)
Preparation
- Preheat the oven to 325°F (160°C). Line a standard 12-cup muffin tin with cupcake liners or lightly grease the cups.
- In a bowl, combine graham cracker crumbs, sugar, and melted butter. Press mixture firmly into the bottom of each cupcake liner to form the base.
- Beat the cream cheese until smooth and free of lumps, then mix in sugar and vanilla extract until combined.
- Add eggs one at a time, mixing well after each addition until the batter is smooth. Scrape the bowl to ensure no pockets of cream cheese remain.
Baking
- Fill the cups with the cream cheese mixture, filling each about three-quarters full.
- Bake for 20–25 minutes, until the centers are set and slightly jiggly.
- Let the mini cheesecakes cool to room temperature, then refrigerate for at least 2 hours before serving.
Chill for longer (4+ hours) for improved texture and flavor. Serve with a mix of toppings for a festive presentation.